Salesforce OAuth and .NET CORE

Using a .NET CORE application to connect to objects in Salesforce using OAuth.
Intro
This document is addressed to C# Developers who understand what Salesforce objects are and need to programmatically extract data from that platform for use elsewhere. For instance, Salesforce may be your company’s system of record for Contacts but there is a business requirement to present this information within another application to users who cannot log into Salesforce.
The Problem: We need to pull records from the Contact object so that we can present that data elsewhere. We’ll be using .NET CORE 3.1 and C# and the Lightning Experience in Salesforce.
All source code is available here, but I highly recommend that anyone reading this go through the exercise of creating and modifying the code on their own in order to have a better understanding of how the solution works.
The video linked here is the primary source material that got me started down this path. It was authored by Aitechone and it explains how to access Salesforce data via their REST API using the OAUTH Password Flow. Password Flow is very similar to Implicit Grant in that it requires only one trip to get an authentication token. For readers who are not familiar with OAuth, don’t worry there will be enough information forthcoming in this post to get you through. The first step is to try out the video. If you need more detail after watching, please continue to read below.
We will be making a simple console application in .NET Core without diving into dependency injection and configuration files. Our purpose in doing so is to connect to Salesforce from .NET Core.
Prerequisites
A Salesforce account that has access to the objects and records you need.
A Salesforce account that has Setup rights to App Manager (an Administrator account).
A general familiarity with .NET.
Familiarity with Workbench will be helpful
Some experience with making REST API calls will also be helpful
1. Actions to take in Salesforce
Set up the org in Salesforce to accept REST calls from a C# application. The application will log in with the user credentials that you provide. The way you protect your credentials is up to you, but I strongly suggest you do not commit secrets to any git repository. Even if it’s a private repo, any repo could become comprised.
Now, the following are the actions needed to set up Salesforce to accept a REST call from a C# application.
Login to the Salesforce instance as an administrator that has access to SETUP, where https://login.salesforce.com/ is production and https://test.salesforce.com/ is the sandbox. May I suggest you start with the sandbox.
Go to Setup. A new tab will open.

In the Quick-find search box, type “App Manager”

The Lightning Experience App Manager should appear. Click the New Connected App button.

Fill out the required fields shown below. Give the connected application a descriptive name and place the appropriate contact email.
Enable OAuth settings. The callback URL of https://localhost will be visible. Enter this as the Callback URL. OAuth must always have a valid callback URL even though your application will never use it. I’ll explain why near the end of this post, but for now just trust me.
Now, grant access to your application. You may want to do some testing on how to lock down your application’s security, but because we’re just attempting to make a useful connection for now, go ahead and grant full access to your application.
Click Save.

You may get a message here that it can take up to 10 minutes for your changes to take effect. That should not delay our initiative here though because we have more than 10 minutes of work left to do.
Click Continue, and the connected application should appear with a Consumer Key and your Consumer Secret. Copy both values into something like Notepad and label each; you will need them later.
Next, login as the user you’ve set aside for your API application. Hopefully it’s not an administrator but has the access needed for all the objects and records that are required.
Once logged in, go to user set-up.

In the menu, go to My Personal Information > Reset My Security Token as shown below.

Note, if you already have a personal security token that you are using, do not reset your token. Instead, copy that and set it aside in Notepad and label it “Personal Security Token”. Otherwise, go ahead and reset your token.
If you reset your token, you will receive an email from Salesforce. Copy that token and label it “Personal Security Token”.
We have now completed all the steps required in Salesforce. Now it’s time to dive into C#.
2. Creating our SOQL query
We now want to create a query
If you already have your SOQL query you don’t necessarily need to go to Workbench but this would be a good time to parse your query to make sure it works.
Log into Workbench at https://workbench.developerforce.com/ and select either the sandbox or production instance (sandbox preferred for this demo).
Select the action SOQL

Select your object. For the demo we’re selecting the Contact object.

Select the fields you wish to include (use the control key to select more than one field). You can also paste an existing SOQL query in the text box.

You can then modify the SOQL. Here I put a filter and a limit of 20 and on the number of results.

If you are happy with your SOQL, set it aside and label it SOQL. You are now done with Workbench.
3. Creating our C# .NET CORE APPLICATION
Open Visual Studio. The screenshots below are taken from Visual Studio 2019.
Under the Get Started section, select Create a New Project

Select a Console Application and click Next

Give it a great name and click Next

For this demo I am selecting .NET Core 3.1 as my target framework. You can select a different one but code might vary somewhat from what will be shown here; most likely where we deserialize JSON. Then click Create.

You now have a very simple Console application that will allow us to concentrate on the important elements of accessing the REST api in Salesforce.
Set up a class that contains all the information needed to log into Salesforce. Remember that we are not diving into managing secrets or doing app settings in this post. We are keeping this simple and doing something we would NEVER do in production.
Create a class file called InstanceDetails. Right-click on your project in Solution explorer and select add>class
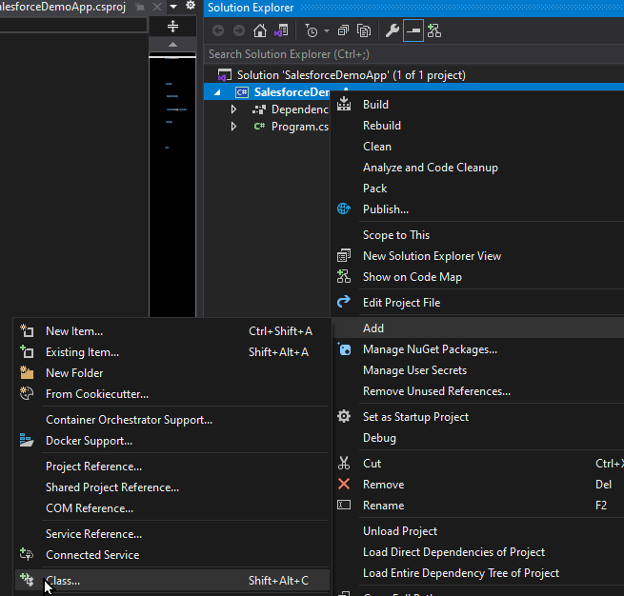
For the class name, call it InstanceDetails. Then click Add.

I like access modifiers specified on my classes. Make the following changes to your class:

Now, the assumption is you have a sandbox instance and a production instance. Go ahead and copy and paste your class again in the same file (normally you wouldn’t have more than one class in a file but that’s okay for this demo). You should then have something like this:

You’ll notice an error squiggly under each class name. Append Sandbox to the top class name and Production to the bottom class name. Then, in the production class LoginEndpoint attribute, change the url text portion from test to login as shown here.

We did this so we can do a simple copy and paste in code later and switch from working with the Sandbox to Production.
Next, populate the class for which you have saved information. If you used the Sandbox in your previous steps, you’ll populate the InstanceDetailsSandbox class, for instance. These are just implementation details for the purpose of this demo. Again, you will need to find a way to hide your secrets, which specifically are your password, your token and client secret. Your username and client id should be protected, too, but if they are not as vital to hide.
Consumer Key maps to ClientID and Consumer Secret maps to ClientSecret.. Personal Security Token maps to Token. The Username is the email address of the user to which the Personal Security Token belongs, and Password is, well, it’s the password for that user.
It’s okay if you just have information for one class, most likely for the Sandbox. You can go through the steps later in Salesforce to populate the Production class, for instance and test your application there, too.
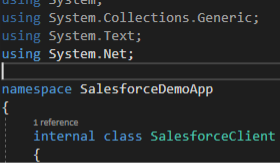
Next, go through the same steps as before to make a class called SalesforceClient. This time there will be only one class.
Make the class internal and add the following properties and constant.

These public properties will allow us to instantiate the SalesforceClient class with information from either the Sandbox or Production.
Next, put a constructor on our SalesforceClient class that will set the security protocols our application will use when connecting to Salesforce via https.

You may have an error squiggle under each of these items. If so, then add “using System.Net to the top of the class file.
The next step is to provide login capability for the application to authenticate and authorize with Salesforce. I’ll provide all the code here for you because it’s certainly a lot of typing.
public void login()
{
var jsonResponse = default(string); // will hold the JSON response Salseforce gives us using (var client = new HttpClient()) // HttpClient allows us to make web requests
{
// create a web form with key value pairs we can send to the server // with information that allows our application to be authenticated // and authorized. A dictionary is simply a collection of key value pairs. var request = new FormUrlEncodedContent(new Dictionary<string, string>
{
{"grant_type", "password" },
{"client_id", ClientId },
{"client_secret", ClientSecret },
{"username", Username },
{"password", $"{ Password }{ Token }" }, // note these are concatenated together
});
request.Headers.Add("X-PreetyPrint", "1"); // get formatted JSON from Salesforce var response = client.PostAsync(loginEndpoint, request).Result; // posting form jsonResponse = response.Content.ReadAsStringAsync().Result; // we asked for JSON Console.WriteLine($"Response: {jsonResponse}"); // we can see the output // this converts the JSON back to key value pairs so we can inspect it more easily var values = JsonConvert.DeserializeObject<Dictionary<string, string>>(jsonResponse); AuthToken = values["access_token"]; // We need our auth token for data requests InstanceUrl = values["instance_url"]; // We need this to parse URLs for our request Console.WriteLine($"AuthToken= {AuthToken}"); // displaying so we can see Console.WriteLine($"InstanceUrl= {InstanceUrl}"); // displaying so we can see
}
}
There are red errors shown here because we need to add using statements and a Nuget package, but let’s try to understand what’s going on here before we continue.

Hopefully the comments in green provide some explanation but the purpose of this step is to get that Authorization Token and Instance Url. There are several different flows in OAuth but the main purpose of the creators of OAuth was to allow an application to log into a data server one or more times and get data as that user for that server using a token instead of credentials. I will cover more about how OAuth works at the end of this post.
Now, get rid of the red squiggly for HttpClient if you have not done so already. Add a using statement for System.Net.Http. Also we’re going to need System.Net.Http.Headers in a few minutes so you might as well add that, now, too.

In order to deserialize JSON (meaning create an object directly from JSON) we need to add a Nuget package. The one used in this demo is Newtonsoft.Json.

To install this package through Visual Studio, select Tools > Nuget Package Manager for Solutions

Select Browse and search for Newtonsoft.json

Select the SalesforceDemoApp project and then click Install

Then add using Newtonsoft.Json to the top of your project file.

We should now test our ability to actually login with the code we have so far.
We need to be able to instantiate our SalesforceClient so we can log in. We’ll create a method for this in the main Program Class and call it from the Main method.

When you press play, a debug console from Visual Studio should appear with Hello World! On the first line and somewhere in the middle Program Ends. Your Auth Token should have printed out along with your Instance URL. Additionally, the actual JSON response should be visible.
Let’s study that JSON to see what it means. Here I formatted it (I thought Salesforce was supposed to do that, didn’t you?) and redacted some information, but yours should follow the same format:
{
"access_token":"**redacted*",
"instance_url":"https://redacted.my.salesforce.com",
"id":"https://test.salesforce.com/id/redacted/redacted",
"token_type":"Bearer",
"issued_at":"1643227013554",
"signature":"redactedbase64encoded"
}
The “access_token” is provided by what in OAuth is termed the Authorization Server and represents information about the user. Normally these are JSON Web Tokens but Salesforce does not appear to use these in their normal three-part form.
The instance URL will be the URL specific to your organization, either a sandbox instance or production. This will be used later when making REST API calls.
The id is your instance id on either the main sandbox domain or production domain. It is not used in this demo.
The token type “Bearer” specifies that REST API requests are to use an authorization header type of Bearer. The Authorization token’s value in the HTTPS request prefixes the string “Bearer “ (with the space) in front of the access token. That’s a good thing because that’s how this demo works.
Issued_at and signature don’t really matter for the purposes of this demo.
Again, all we need from the JSON is the access token and instance URL. In fact, you can probably hard-code the instance URL (though that’s not what I’d suggest) so that access token is all important.
Now that we’ve logged in, we need to run that SOQL statement to get some data. We need to write three more functions, for which I’ll include the code here and then we’ll go through each function to understand what’s happening. Forewarning, we will be rewriting these functions again a bit later. This is part of that deep-dive I mentioned at the top.
public string Query()
{
// 5000 should be the limit
var result = default(string);
string soqlQuery = "SELECT AccountId, Email FROM Contact where Email != null Limit 2";
using (var client = new HttpClient())
{
string restRequest = $"{ InstanceUrl }{ apiEndpoint }query?q={ soqlQuery }";
using (var request = GetNewHttpGetRequest(restRequest))
{
result = GetResponse(request, client);
}
}
return result; }
private String GetResponse(HttpRequestMessage request, HttpClient client)
{
var response = client.SendAsync(request).Result;
return response.Content.ReadAsStringAsync().Result;
}
private HttpRequestMessage GetNewHttpGetRequest(string url)
{
var request = new HttpRequestMessage(HttpMethod.Get, url);
request.Headers.Add("Authorization", $"Bearer { AuthToken }");
request.Headers.Accept.Add(new MediaTypeWithQualityHeaderValue("application/json"));
request.Headers.Add("X-PreetyPrint", "1");
return request;
}
Let’s talk about the main Query method first.
Note that the SOQL query puts a limit of 2 records. We’re going to be getting JSON back and we’ll need to format and analyze it. So we need to see the overall format but not get overloaded while making that analysis.

We need to create another HTTP client just like we had for logging in originally. This is an extremely useful class but we need to remember it is disposable. Hence the using statement for which I’m using the old style with curly braces. The restRequest variable is a result of parsing InstanceUrl and apiEndpoint. Remember that constant at the top of the class? That’s where we go for making these initial requests. You’ll also note that the URL has a query string variable named, somewhat conveniently, “query” who’s value is the actual SOQL query. We then call GetNewHttpGetRequest with our URL and then use that to call GetResponse. But how do they work?
GetNewHttpGetRequest requests a request message to let the server know what we’re looking for. The HttpClient is the class with the means to contact the server but what HttpClient is actually asking for is in the HttpRequestMessage, which contains the URL to go to (and what query to run, embedded in the header in this case), what HTTP verb to use (GET), and headers telling the server who we are (the Authorization header) and how we want our data returned (the media type and X-PreetyPrint headers). That’s the purpose of this method.
GetResponse takes that HttpRequestMessage along with the HttpClient and sends the actual request to the data server and reads the response back out as a string.
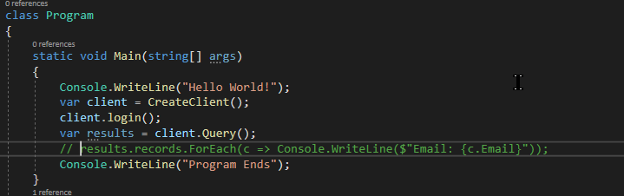
Now we need to call the query and get results. Insert before the last line of the Main method in the class Program insert the following line:
Console.WriteLine($"Client Query: {client.Query()} ");

Now run the application.
On the console you should see where the Client Query output some JSON. Let’s format and analyze it with some redacted data.

The totalSize attribute specifies how many records were requested and the done attribute lets you know you received all the records you requested. This will become very important later.
The records attribute is an array of collections of keys. That’s what square brackets mean in JSON, an array; and curly braces are a collection of keys. Each key collection has three attributes, “attributes”, “AccountId”, and “Email”. That first attribute called “attribute” itself is a collection of keys, “type” and “URL”. In all honesty, we don’t care about the “attribute” attribute, only “AccountId” and “Email” because these were the columns we asked for in our SOQL query. But we had to analyze this JSON so we could understand how to deserialize to get the objects we need, namely a collection of account objects.
Now it’s time to create our classes (models) to deserialize this JSON. First, create a Models class file the same way we created the InstanceDetails.cs file. This class file will hold all the classes we need to model the JSON we just analyzed.
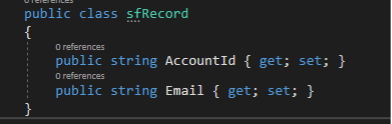
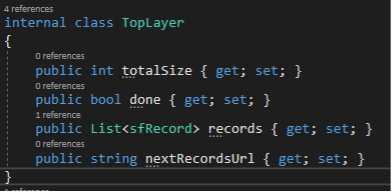
Replace the Models class with an internal class TopLayer and add another internal class called sfRecord such that you have something like this:

Now that we have our two models, let’s see how we should define them based on the JSON from Salesforce.

Note that sfRecord is a collection of keys, akin to a collection of properties for a C# object. To model the sfRecord portion of the JSON we need the two properties:
The TopLayer portion has two scalar attributes, totalSize and done; and one attribute that is an array of sfRecords. It’s very important to notice that the values for totalSize and done are NOT IN QUOTES. This means when these are deserialized they are not strings. So you will want to pick an appropriate data type as shown here:

We now can deserialize the JSON we get back from Salesforce for the SOQL query we wrote.
Update the Query() method so we can actually parse our data. Look at the GetResponse method again where only a JSON string is returned.

Obviously, we can’t use a JSON string, which is why we created our two models. We need to update this method to return a TopLayer object that has all of our sfRecords inside. We need to change the method to look like this, instead:

Notice that the method class returned is TopLayer instead of string. Additionally, we are no longer using Content.ReadAsStringAsync; instead we’re reading in a stream, which is a series of bytes instead of characters. That’s because the tool and the methods we are using, Newtonsoft.Json, require us to pass in a StreamReader, so we follow the pattern. The magic happens on the second to the last line where the JsonTextReader jsonReader is deserialized directly into the TopLayer object. What’s so beautiful about this is that our TopLayer class is nested with a collection sfRecord class, and yet this works because of how we designed our models to emulate the JSON itself.
Now we’ve broken our Query() method:

Our result is not a string anymore. This is easily fixed by changing the first line so that this is a default(TopLayer) instead of default(string); and by changing the return type of the method to TopLayer.
But we broke something else now, the Program Class’ MAIN method won’t work as expected.

Line 14 will simply run the ToString method on a TopLayer object and that won’t do us any good at all. It would be better to populate some variable with the results of client.Query() and then figure out how to output that to the console.

Go ahead and run the application. You should get two lines with email addresses on your console, assuming you have at least two Contacts that are returned from your query.
At this point you’re in pretty good shape. You can see that all you have to do to access your Contact records is to access the records property of your TopLevel class object; but there’s a catch (there’s always a catch). What if you want more than 2,000 records?
That’s right, if you want more than 2,000 records you’re going to have to go get them with more calls. My source for solving this problem is here: https://developer.salesforce.com/docs/atlas.en-us.api_rest.meta/api_rest/dome_query.htm but I will walk through this in some more detail. However, without getting too hung up on inspecting the JSON for results with more than 2000 records, just know that the “done” attribute is set to false and one more attribute comes into play at the top level: “nextRecordUrl” so add this attribute to your TopLevel class as a string:
Also, update your SOQL statement so your LIMIT is above 2000.

Place a breakpoint on the last line of the Query() method in your SalesforceClient class. We’re going to inspect the TopLevel values that come back for when results are too large to be retrieved in one go.
Run your application and await the hit to your breakpoint.

What I’ve done here is create a watch to make it easier to inspect variables I’m interested in. There are several items of interest here. First, note “done” is now false, the records attribute shows 2000 records have been returned while totalSize states there are 5000 total records. Most interestingly, there’s a nextRecordsUrl. In order to get the next set of records, we need to go to that url instead of the initial one. So we need to enter some kind of loop that uses the nextRecordsUrl until done is finally true.
Also note the nextRecordsUrl does not contain any domain information. This is where our InstanceUrl property will come in handy later.
Fortunately, the way we created our Query method and factored GetResponse and GetNewHttpGetRequest as separate methods should make this less painful than it could have been (such as when I first came across this problem).
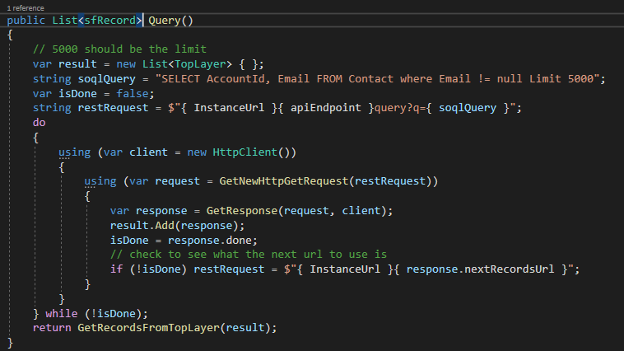
The idea here is to place the using clause in a do loop.

All that changed here is two things really. First, we created a Boolean variable isDone, set it to false, and are using that for our while clause in our do loop. Secondly, we are populating isDone with result.done.
But there are still two things wrong with this. First, we’ll always be returning the last TopLayer object we find and discarding all the rest. And secondly, we’re not using the nextRecordsUrl attribute and calling the appropriate url. So first, let’s move the stringRequest line above the do loop and take advantage of the nextUrl attribute:

Then, we need to return a LIST of TopLayer objects. So we change result from a TopLayer object to a list of them and add the response to a LIST of TopLayer responses. We also should change the signature of our method to match what we’re returning:

Note we are now using the InstanceUrl to prefix the nextRecordsUrl.
Now we have an error in our Program class main method. Since we’re going to be using the debugger to inspect our results, we don’t need to concern ourselves so much with writing to the console for now. So we can go to the line where we’re writing to the console our emails and comment it out:
Then make sure you have a breakpoint on the last line of Query and run the application again. Let’s inspect our result:
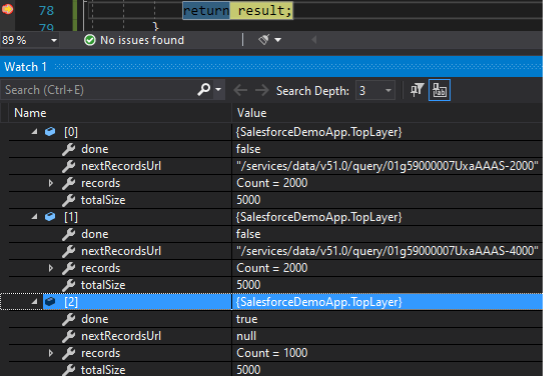
For the first two runs done is false and there is a nextRecordsUrl (different each time). The total size remains at 5000 for all three runs but records.Count is 1000 for the last run. We now have all of our data but it’s in a list of TopLayer objects, and that’s not helpful. So there’s one more thing we can do once we have run our REST API queries to make our data more accessible. After all, we want to present a list of sfRecords, not TopLayer objects.
Let’s create a method that can turn a list of TopLayer objects into our list of sfRecords by placing the following method into the SalesforceClient class:
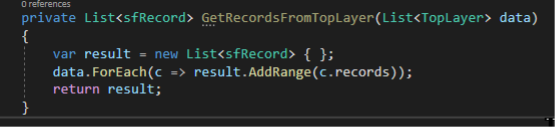
Hopefully this looks straight-forward. It simply creates an empty list of sfRecords and iterates through each TopLayer object and adds the collection of each into our list and returns the result.
Then we can change the last line of the Query method from simply returning the result to returning GetRecordsFromTopLayer(result) and change the return type to List<sfRecords>:
And finally we can change our Main method on line 13 (I’ll add a line below so it’s easier to see what changed:

All that had to be done was remove the “.records” from “results.ForEach”. Now run the application.
Success
That was a fairly deep dive into how to use a C# .NET CORE application to retrieve data from a Salesforce instance, but I hope it was useful for you.
OAuth
I want to give warning up front that I will be editorializing just a bit and going into some detail.
For those of you who have some questions about how OAuth works, the purpose of OAuth generally is to allow users of a resource such as Facebook, Salesforce, etc. to grant permission to an application to access their data on that resource. That is, OAuth was designed not to authenticate people (which is to determine WHO they are) but to allow applications to be AUTHORIZED to do certain tasks such as see and possibly manipulate data on behalf of a user.
To be authenticated means to be identified. To be authorized means to be granted rights to do tasks.
However, OAuth has been used off-label as an authentication protocol and Open ID Connect is OAuth’s response to this off-label use in order to make that easier. Open ID Connect is a small extension of functionality in OAuth but is not necessary; it just removes one step in one of the so-called flows of OAuth.
The idea behind OAuth is to allow an application to be authorized in the name of a user without ever being given access to that user’s credentials. Normally what would happen in most flows is an application would redirect a user to an authorization server (such as Salesforce) where she would then enter her user name and password and grant access to the application which sent her there. Included in that redirect url would be information about the application that sent her to log in, including a callback URL so the authorization server will know where to redirect the user back to the original web application.
When the user is sent back to the calling application, there will also be a token that the calling application can use to either directly access resources (implicit grant flow) or call behind the scenes again for the real token (authorization code flow). Implicit grant has a problem because any token received this way in the web browser is vulnerable to viewing in web browser dev tools and can be stolen. Authorization code flow requires the calling application to make yet another call, a REST api call unseen from the client browser, for the real token that authorizes the application to access permissions.
What OpenIdConnect, implicit grant, and authorization code flow all have in common is the calling application does not know who the user is until it presents the authorization token to the OAuth server. In the case of implicit grant, the token received by the user is the actual authorization token and the application can ask the OAuth resource server who the token is for (that would be authentication). In the case of authorization code, we use our initial token to get an authorization token, and THEN we ask the resource server who the user is (again, this is where we can authenticate who the user is according to the OAuth resource server).
Open ID Connect is very similar to authorization code except when the application presents the user’s token to receive an authorization token, the application also receives user information (to authenticate) in that same step. There is no need to make another call again explicitly for user information.
What makes the OAuth in Salesforce a bit different for what we’re doing here is we are using the password flow for an automated service to access Salesforce data. We can’t wait for a user to log in before we start our work. We have to be our own user. So we use the password flow that includes a user name and password. Our application already knows who we are. We are simply trying to get authorization from Salesforce on our own behalf. Password flow makes absolutely no sense for people using web browsers to use, but it makes perfect sense for services to use.
OAuth servers must have a list of one or more callback URLs for any given application that wants to connect so that users can be redirected to a list of known and approved URLs. This prevents the OAuth resource server from being used nefariously by malcontents spoofing real clients.
And this explains why our callback URL with Salesforce must be provided but can be set to a dummy value like https://localhost. We’re not dealing with users who need to log in via a browser that would then need to be redirected back to our application.